 |
| Sunflower photo courtesy of Wikimedia Commons |
I love a Sunflower, and I believe in love power,
Love Power, Love Power!
(Lyrics from the song Sowing the Seeds of Love
by the big 80's pop band Tears for Fears).
 |
| I use coin envelopes for seed collecting and saving. |
Every spring on the second weekend of April I get out my seed starting equipment and convert the basement into a greenhouse. Some years I start only flowers and other years both vegetables and flowers. A couple of seasons ago I grew hundreds of wild Bee Balm seedlings indoors, and that was good enough. Because I also have two small outdoor nurseries where I cultivate many trees and native perennials from seeds, what I grow indoors are mostly annuals that are transplanted to summer vegetable and flower beds.
This year I'm revved up about starting veggies because I have more control over which varieties I can grow. Retail nurseries have gotten better about selling a slightly larger sampling of unique varieties but it's nothing compared to what a gardener can find in a packet of seeds, and I love any adventure involving plants.
 |
The potted geraniums and herbs have been
relocated to the screened porch
to make way for seedlings. |
I begin the day before by cleaning the seed trays and pots with bleach and water. I also moisten the planting media so that it is ready to work with. There are many different brands of soil-less seed starting mixes on the market, and I've tried most of them. Here's my review of four brands you'll find at retail stores: the two I especially dislike are Hoffman and Black Gold--both are extremely dusty and take forever to wet (absorb moisture). The Hoffman bag contained vermiculite, which I despise because it is a known lung irritant and carcinogen--hello, asbestos is made with vermiculite.
Black Gold is so finely ground it reminds me of Dutch cocoa, but not nearly as delicious. It's overly hydrophobic and therefore takes too long to moisten, and after a few days in the seed trays it readily grows green mold.
 |
The winner.
|
Miracle Gro makes a very good seed starter mix--it wets quickly but isn't soggy, and when you open the bag it doesn't fly up your nostrils, but the best yet is Espoma Organic, which I tried for the first time this year. It's the highest priced of the four because it's organic and because they added several strains of mycorrhizae. (Yes, that magic fungi that grows naturally and for free, wherever plants grow, like in your yard!) Thing is, seed starting mixes and potting soils are sterilized, for good reason, and this process kills fungi and bacteria--see where I'm going here? That's right, mycorrhizae is of no use to seedlings when it's stone cold dead. Nevertheless, Espoma brand wins hands down because it has the best texture, is not the least bit dusty, and it wets perfectly, and that's worth paying for.
 |
| Wetting the soil-less seed starting mix. |
Before you plant, pour the starting mix into a large, clean bucket--be sure to sterilize the container with bleach and water first--and add just enough water to evenly moisten the media. It should just barely hold together in your palm when you squeeze it. Next fill every 1" cell in the tray to the top with moistened mix, and then tap the tray to settle. You can even the media with very light finger pressure, but whatever you do, don't pack it down in the cells. Now you are ready to sow!
 |
| Seed dial. |
A seed dial is helpful for dispersing one seed at a time, especially the tinier ones. Place the seeds inside the device and then rotate the dome to change the size of the opening so that it's just large enough to allow the seeds to pass through. With a little practice you'll get good at rotating and carefully tapping out a single seed, which rolls down the shoot and lands directly in the seed tray where you want it to go. Keep an excellent pair of pointy tweezers on hand to pick up any stray seeds that are too small for your meaty fingertips.
 |
Seed trays planted, marked, and set beneath
full spectrum grow lamps. |
Now, let's take a peek at at some of the plants I've started for 2012. Hint: if you've read my blog you already know how much I love Renee's Seeds. As usual, I placed a big order with her company this spring, and I am in her media database (that's right, Shane VanO is now "The Media") which means I got a few free packets to trial in my garden so I can blog about it. Sweet.


Shortly after the seeds germinate they will produce their first set of true leaves, growing at the apex of the stem. In case you don't know, the first thing that emerges is the cotyledon, those lobed-shaped things. Begin adding a diluted all-purpose fertilizer to the water as soon as the actual leaves appear, just as you see in the photo below.
 |
| Napa cabbage seedlings. |
In about two-to-three weeks the seedlings must be removed from their starting cells and placed in four inch pots filled with fresh potting soil. Give each seedling cell a gentle squeeze from below to loosen the roots, and then firmly grasp the stem (two fingers) of the plant directly where it meets the mix and carefully remove it.
 |
| A healthy root ball. |
If you come away with at least 50 percent of the root ball, consider it successful. Transplant into four inch pots immediately, and moisten the soil. Now begin fertilizing at full strength. Snip off most or all of what remains of the cotyledon to reduce transpiration and minimize shock. After a few days I will often remove the lowest (first) set of true leaves on plants like tomatoes, to stimulate top growth.
 |
| Pixie Cabbage and French Pumpkins |
 |
| Felco is the best! I use this model for pruning seedlings. |
In another two to three weeks your plants will have grown tremendously but they are not ready to put in the ground until they have transitioned to the real world and the outside soil temperatures are in the 70's. Heat loving vegetables will be stressed and stunted if planted in cold soil. Find a suitable outdoor spot for hardening off, a place that receives partial or indirect sunlight, and is not windy or cold. If necessary, bring the plants back inside at night--they are astoundingly tender and vulnerable after being pampered indoors.
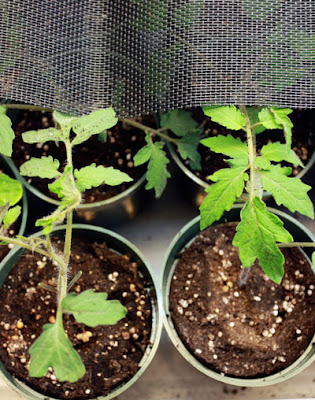 |
| Protect the seedlings from direct sunlight. |
One of my techniques is to place my plants in plastic storage tubs (leave off the lids) and then cover the tubs with sections of vinyl screening, or shade cloth. This cuts the intensity of direct sunlight enough to prevent scorching of tender foliage. At the very end of May or the beginning of June, the plants are toughened up and ready to go into the garden!
Shane VanOosterhout is The Passionate Gardener.
For more garden inspiration, you can follow him on Facebook.


2 comments:
Hey this is really so nice post i am so inspired here could you more share here i will be back to you as soon as possible.
Thanks for sharing...
Thanks for stopping by and I hope you come back again soon! :-)
Post a Comment